
Configuring Okta SSO
Connect your Okta organization to TextCall so your team can sign in to the TextCall portal with their existing corporate credentials.
TextCall supports Single Sign-On (SSO) through any Okta organization using OpenID Connect (OIDC). Once SSO is enabled, your users sign in to the TextCall portal with their Okta credentials, and access is governed entirely by your Okta group assignments and sign-on policies.
This guide walks an Okta administrator through creating the app integration, sharing credentials with Intergo Telecom, and verifying the connection.
Who this guide is forYou need Super Administrator or Application Administrator permissions in Okta, and an active TextCall account. If you don't administer your company's Okta organization, forward this guide to your IT or identity team.
Before you begin
Make sure you have the following:
| Requirement | Details |
|---|---|
| Okta admin access | Super Admin or Application Admin role |
| TextCall account | An active account in good standing |
| Verified email domain | The email domain your Okta users sign in with, for example yourcompany.com |
| A maintenance window | Existing password-based logins are affected once SSO is enforced. See Step 6. |
Enterprise plan featureSSO is available on TextCall Enterprise plans. Contact your account manager to confirm your plan includes it before starting.
How TextCall SSO works
TextCall acts as the OIDC Relying Party and your Okta organization acts as the Identity Provider. The flow is service provider initiated:
- A user opens the TextCall portal and enters their work email address.
- TextCall matches the email domain to your SSO configuration and redirects the browser to Okta.
- Okta authenticates the user against your sign-on policies, including MFA.
- Okta redirects back to the TextCall Sign-in Redirect URI with an authorization code.
- TextCall exchanges the code for tokens, reads the user's identity claims, and creates the portal session.
TextCall matches the email claim returned by Okta to an existing TextCall user. Users are not created automatically; see User provisioning.
Step 1: Request SSO activation from TextCall
Contact your TextCall account manager and ask them to enable Okta as an SSO provider for your account.
They will send you two values needed in Step 2:
- Sign-in Redirect URI: where Okta returns the user after authentication.
- Sign-out Redirect URI: where Okta returns the user after they sign out.
The redirect URI is unique to your account and cannot be guessed or constructed manually.
Step 2: Create an OIDC app integration in Okta
-
Sign in to your Okta organization and open the Admin Console.
-
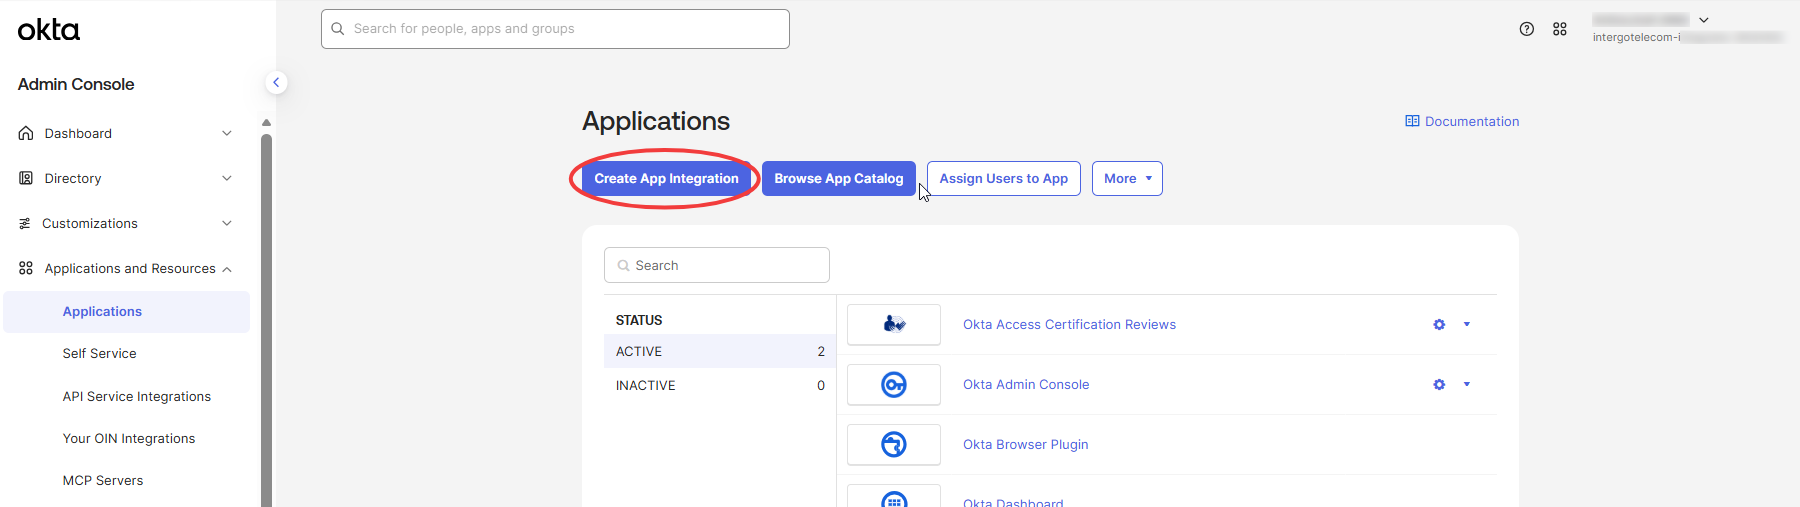
In the left navigation, go to Applications > Applications, then click Create App Integration.
-
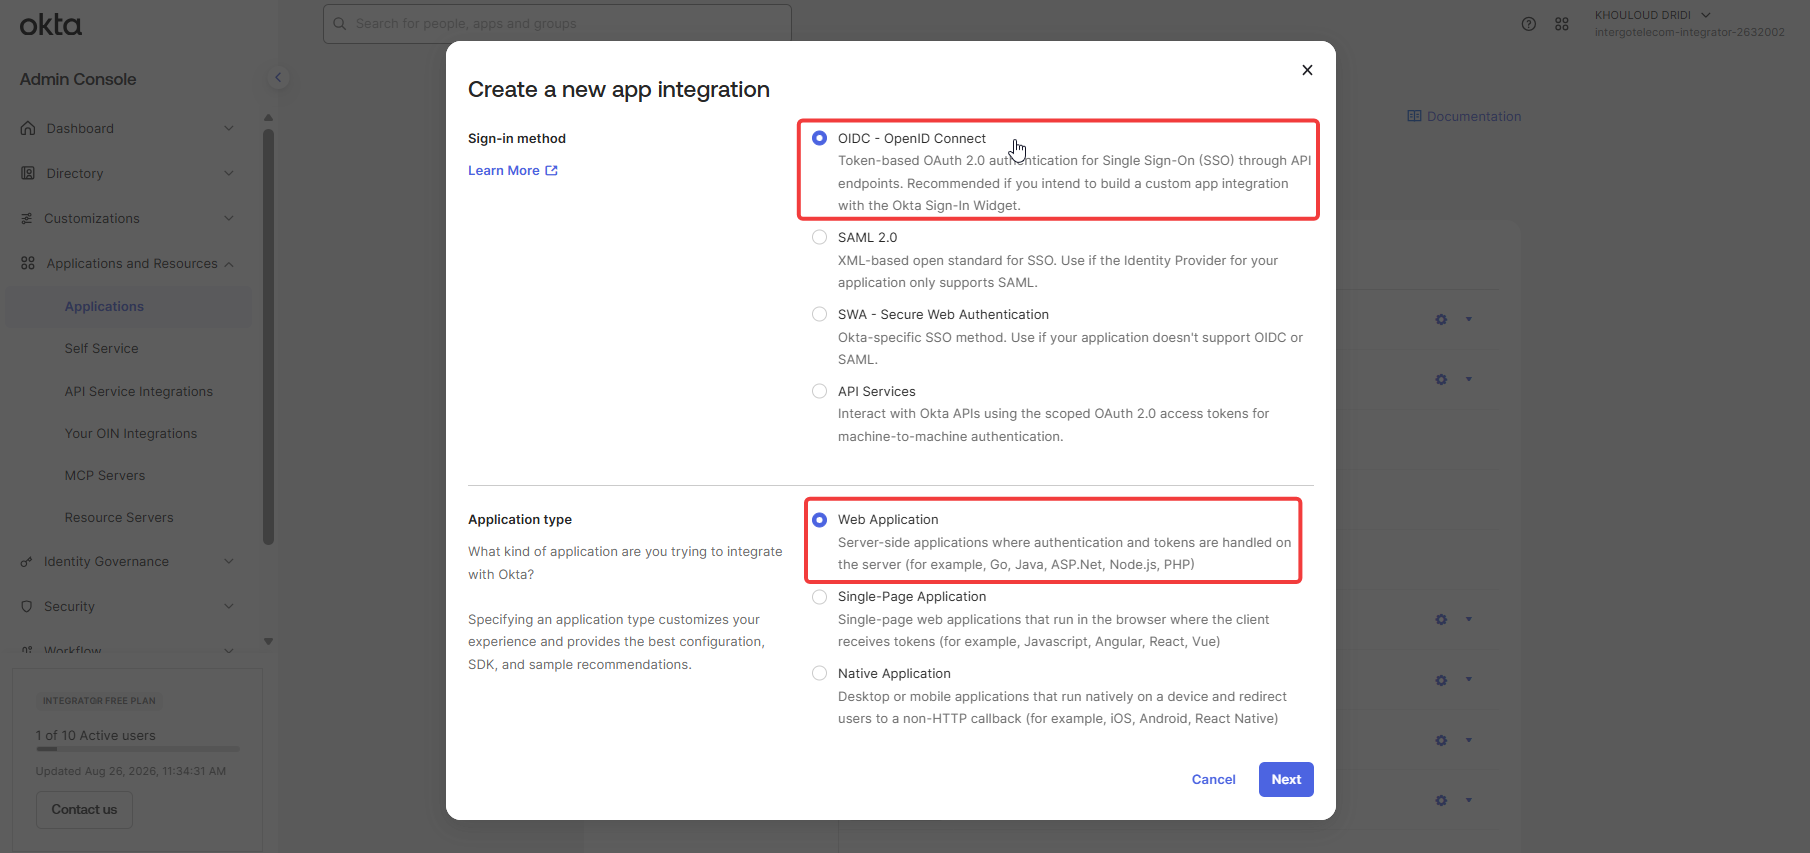
Select OIDC – OpenID Connect as the Sign-in method.
-
Select Web Application as the Application type, then click Next.
-
Complete the New Web App Integration form:
Field Value App integration name TextCall(or any name your users will recognize)Logo Optional. Upload the TextCall logo so it's identifiable on the Okta dashboard. Grant type Authorization Code only. Leave Implicit (hybrid) unchecked. Sign-in redirect URIs The Sign-in Redirect URI from Step 1 Sign-out redirect URIs The Sign-out Redirect URI from Step 1 Trusted Origins – Base URIs Leave empty -
Under Assignments, choose how access is controlled:
-
Limit access to selected groups (recommended). Enter the Okta group or groups whose members should reach TextCall.
-
Allow everyone in your organization to access; grants every Okta user the ability to attempt a TextCall login.
-
-
Click Save. Okta creates the integration and opens its configuration page.
Step 3: Collect and share your credentials
From the app integration's General tab, copy:
| Value | Where to find it |
|---|---|
| Client ID | General tab > Client Credentials |
| Client Secret | General tab > Client Secrets. Click the eye icon to reveal it, or generate a new secret if none is shown. |
| Okta Domain | Top-right of the Admin Console, for example yourcompany.okta.com |
| Issuer URI | Security > API > Authorization Servers, then copy the Issuer URI of the authorization server you're using |
Okta domain vs. Issuer URIThese are usually but not always the same. If you use the org authorization server, the issuer is
https://yourcompany.okta.com. If you use a custom authorization server, it ishttps://yourcompany.okta.com/oauth2/{authorizationServerId}. If you've configured an Okta custom domain, the issuer uses that domain instead. Send the exact value shown in the Issuer URI field.
Share these with your TextCall account manager.
Transmit the client secret securelyThe client secret grants the ability to impersonate your integration. Do not send it by email, chat, or ticket comment. Use the secure upload link your account manager provides, or an agreed encrypted channel. TextCall staff will never ask for your Okta admin password or any user credential.
Step 4: Test the connection
Once TextCall confirms the configuration is in place:
- Ask one assigned user, ideally not the Okta admin, to open the TextCall portal in a private browser window.
- Enter their work email address on the sign-in page.
- Confirm they are redirected to Okta, authenticate, and land in the TextCall portal.
- Sign out and confirm the session ends cleanly.
- Repeat with a user not in the assigned group and confirm access is denied.
Test with a small pilot group before rolling out to the whole organization.
Step 6: Choose how SSO is enforced
Tell your account manager which mode you want:
| Mode | Behavior | Use when |
|---|---|---|
| Optional | Users may sign in with SSO or with their existing TextCall password | Piloting, or during a phased rollout |
| Enforced | Password sign-in is disabled for your domain; all users must go through Okta | Standard production posture |
Before enforcing SSOConfirm that every active TextCall user in your account has a matching, assigned Okta account. Any user without one loses portal access the moment enforcement is switched on. API keys and programmatic access are unaffected by SSO enforcement.
User provisioning
TextCall does not create user accounts automatically from Okta. A user must exist in your TextCall account and be assigned to the Okta app integration before they can sign in.
When someone joins:
- Invite them in the TextCall portal
-
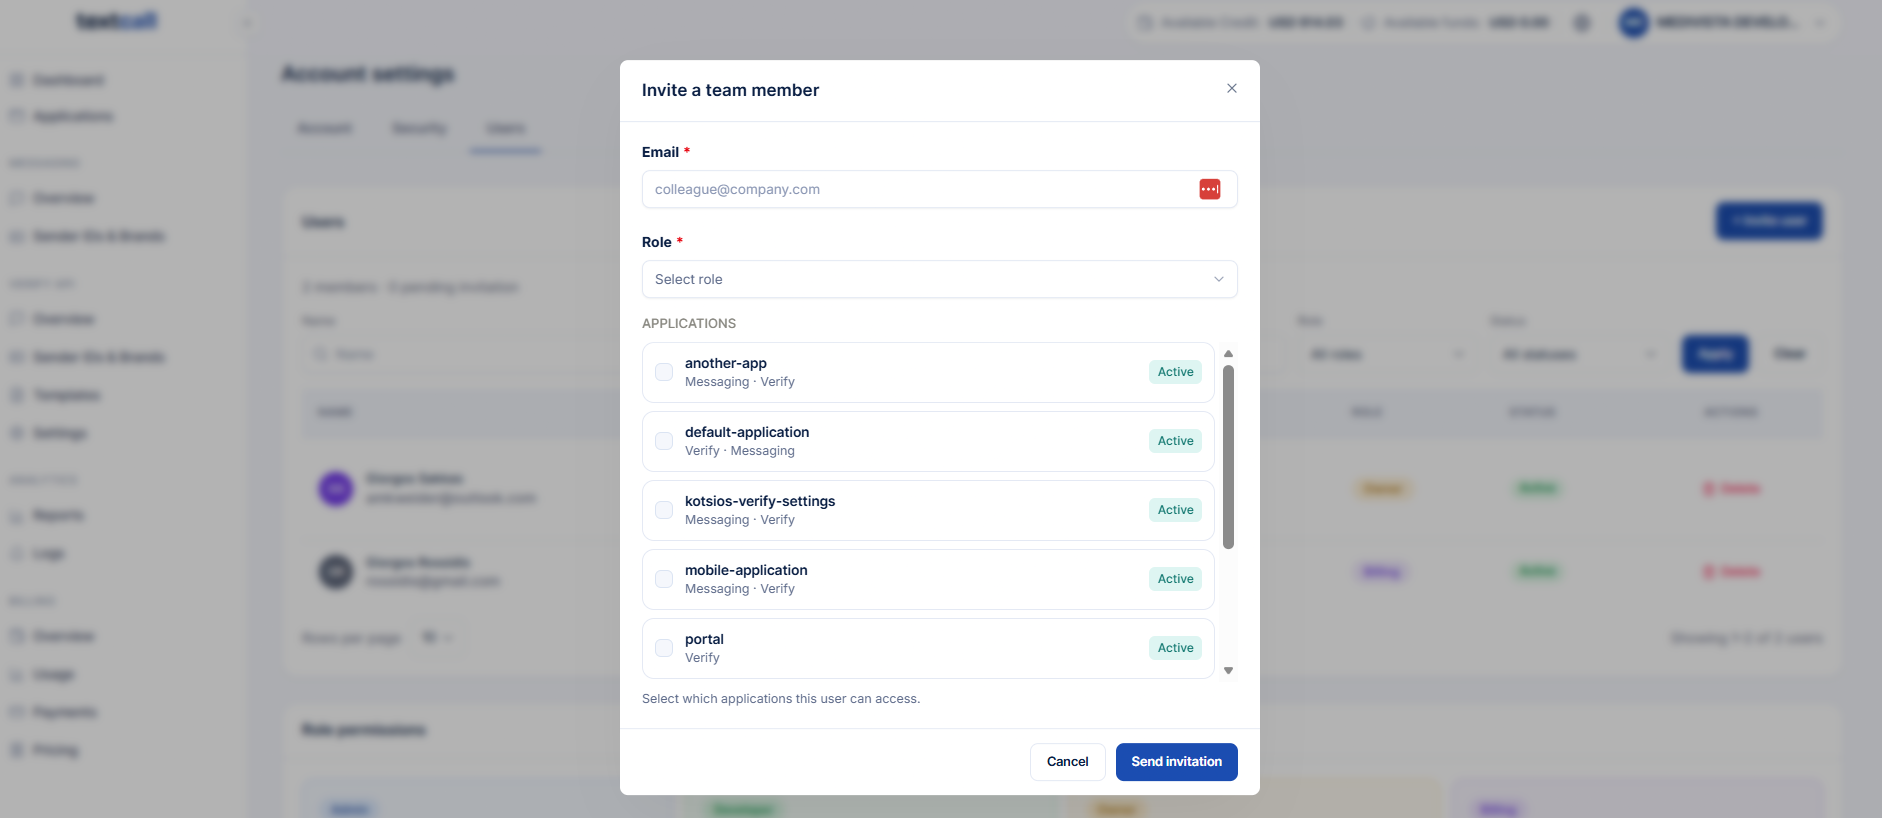
Click on your Company Name on the top right, then Account Settings > Users.
-
Click the Invite User button, add the user's email, choose the role, and the applications they will have access to
-
- Assign them to the Okta group linked to the TextCall app.
When someone leaves your organization, remove them from the Okta group. To fully revoke access, also deactivate them in the TextCall portal.
Rotating the client secret
Rotate the secret if it may have been exposed, or on your normal credential rotation schedule:
- In Okta, open the app integration and click Generate new secret. Both secrets remain valid.
- Send the new secret to your TextCall account manager through your secure channel.
- Once TextCall confirms the update and you've verified a test login, delete the old secret in Okta.
Deleting the old secret before TextCall applies the new one will break sign-in for all users.
Updated 24 days ago